
wintertreey 님의 블로그
ajax를 이용해 db에 이미지 넣어보기 본문
db에 다운로드해보자
친구사진 넣어보기
create table friend(
bunho int primary key,
irum varchar(20),
junhwa varchar(15),
jikup varchar(50),
sajin blob,
imagetype varchar(255));
insert into friend(bunho, irum, junhwa, jikup) values(1, '신기해', '01011111234', '자바개발자');
select * from friend;
엔티티
@Entity
@Data
@AllArgsConstructor
@NoArgsConstructor
@Builder
public class Friend {
	@Id
	//@GeneratedValue(strategy = GenerationType.IDENTITY);//bunho 칼럼이 auto_increment일때
	private int bunho;

	private String irum;
	private String junhwa;
	private String jikup;

	@Lob //BLOB 또는 CLOB타입으로 처리됨
	private byte[] sajin;
	private String imagetype;

	@Transient //DB와 관련없는 임시 데이터 저장용
	private String base64Image; // base64로 인코딩된 이미지 타입

}
레퍼지토리
public interface FriendRepository extends JpaRepository<Friend, Integer>{
	//최대 bunho값 구하기
	@Query("select max(f.bunho) from Friend f") //엔티티명과 맞춰줘야한다. 그래서
	Integer findLastBunho();
}
서비스
@Service
public class FriendService {
	@Autowired
	private FriendRepository friendRepository;

	public void saveFriend(Friend friend) {
		friendRepository.save(friend);
	}

	public List<Friend> findAll(){
		//Friend를 모두 읽어 각 객체의 사진을 Base64로 변환후, 그 결과를 리스트에 저장.
		return friendRepository.findAll()
				.stream().map(this::convertToBase64).collect(Collectors.toList());
	}

	private Friend convertToBase64(Friend friend) {
		//사진을 Base64로 인코딩해서 DB에 저장
		if(friend.getSajin() != null && friend.getSajin().length >0) {
			String base64Image = Base64.getEncoder().encodeToString(friend.getSajin());
			friend.setBase64Image(base64Image);
		}
		return friend;
	}

	//bunho 증가
	private int generateBunho() {
		Integer lastBunho = friendRepository.findLastBunho();
		if(lastBunho == null) {
			return 1;
		}else {
			return lastBunho +2;
		}
	}
}
로직을 구현해보자.
하나씩 작업물별로 잘라내어 확인해보자
@Controller
public class WebController {

	@GetMapping("/")
	public String showStartPage() {
		return "start";

	}
<html xmlns:th="http://www.thymeleaf.org">
<head>
<meta charset="UTF-8">
<title>templates/start.html</title>
</head>
<body>
<h2>시작 페이지</h2>
<a th:href="@{/list}">DB 자료보기</a>
</body>
</html>@Controller
public class WebController {
@Autowired
private FriendService friendService;
@GetMapping("/list")
public String showList(Model model) {
List<Friend> friends = friendService.findAll();
model.addAttribute("friends", friends);
return "list";
}
}<html xmlns:th="http://www.thymeleaf.org">
<head>
<meta charset="UTF-8">
<title>templates/list.html</title>
</head>
<body>
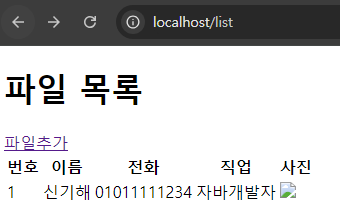
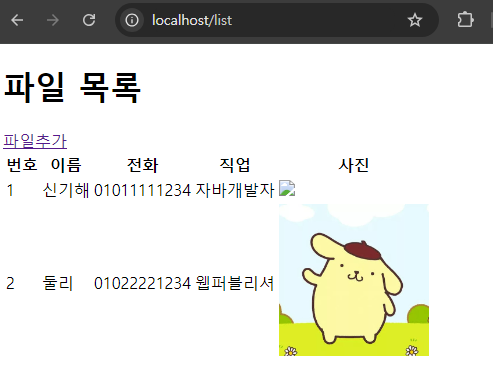
<h1>파일 목록</h1>
<div>
<a th:href="@{/insert}">파일추가</a>
</div>
<table>
<tr>
<th>번호</th><th>이름</th><th>전화</th><th>직업</th><th>사진</th>
</tr>
<tr th:each="friend:${friends}">
<td th:text="${friend.bunho}">1</td>
<td th:text="${friend.irum}">이희동</td>
<td th:text="${friend.junhwa}">010-2222-1234</td>
<td th:text="${friend.jikup}">파이썬개발자</td>
<td>
<img th:src="'data:'+ ${friend.imagetype} + ';base64, '+ ${friend.base64Image}" style="width:150px;height:auto;">
</td>
</tr>
</table>
</body>
</html>
insert
@Controller
@RequestMapping("/insert")
public class UploadController {

	@GetMapping
	public String showInsertForm() {
		return "insert";
	}
<html xmlns:th="http://www.thymeleaf.org">
<head>
<meta charset="UTF-8">
<title>templates/insert.html</title>
</head>
<body>
<div th:if="${message}" style="color: red;">
 <p th:text="${messsage}"></p>
</div>

<h1>사진등록</h1>
<form th:action="@{/insert/upload}" method="post" enctype="multipart/form-data">
 번호: <input type="text" id="bunho" name="bunho" required="required"><br>
 이름: <input type="text" id="irum" name="irum" required="required"><br>
 전화: <input type="text" id="junhwa" name="junhwa" required="required"><br>
 직업: <input type="text" id="jikup" name="jikup" required="required"><br>
 사진 선택: <input type="file" id="file" name="file" required="required"><br>
 <button type="submit">등록</button>
 <button onclick="history.back()">이전</button>
</form>
</body>
</html>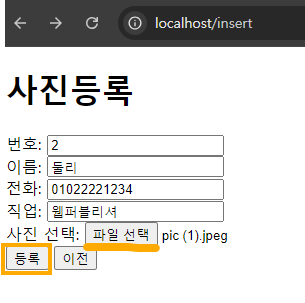
@Controller
@RequestMapping("/insert")
public class UploadController {
	@Autowired
	private FriendService friendService;

	@PostMapping("/upload")
	public String handledFileUpload(@RequestParam("bunho") int bunho,
			@RequestParam("irum") String irum, @RequestParam("junhwa") String junhwa,
			@RequestParam("jikup") String jikup, @RequestParam("file") MultipartFile file,
			RedirectAttributes redirectAttributes) {
		if(!file.isEmpty() && file.getSize() > 2097152) { //파일크기 2MB로 제한
			// Flash 속성 추가 메소드. 일회성. 주로 리다이렉트 후 사용자에게 메세지 전달에 사용.
			redirectAttributes.addFlashAttribute("message", "파일크기가 너무 커요");
			return "redirect:/insert";
		}
		//image mime type 예) image/jpeg, image/png
		if(!file.getContentType().startsWith("image/")) {//이미지 파일인지 확인
			redirectAttributes.addFlashAttribute("message", "이미지 파일만 업로드 가능합니다");
			return "redirect:/insert";
		}

		//insert처리
		try {
			Friend friend = new Friend();
			friend.setBunho(bunho);
			friend.setIrum(irum);
			friend.setJunhwa(junhwa);
			friend.setJikup(jikup);
			friend.setSajin(file.getBytes());
			friend.setImagetype(file.getContentType());

			friendService.saveFriend(friend);
		} catch (Exception e) {
			redirectAttributes.addFlashAttribute("message", "이미지파일저장중 오류발생: "+ e);
			return "redirect:/insert";
		}
		return "redirect:/list";
	}
}
'백엔드 > Spring' 카테고리의 다른 글
| Spring security (0) | 2024.08.19 |
|---|---|
| ajax(fetch)로 db연동해서 출력하기 (0) | 2024.08.16 |
| 파일 업로드, 다운로드 (0) | 2024.08.13 |
| JPA 쿼리 메소드 참고 글 (0) | 2024.08.08 |
| entity와 dto의 분리 (0) | 2024.08.07 |
'백엔드/Spring' Related Articles
more


