

wintertreey 님의 블로그
constructor/setter injection, scope 다형성 캐스팅 본문
이번에는 Constructor Injection, Setter Injection 모두 적용시켜보자. Sum up!
기본 작업
pom.xml - maven 작업. dependencies 넣어주기
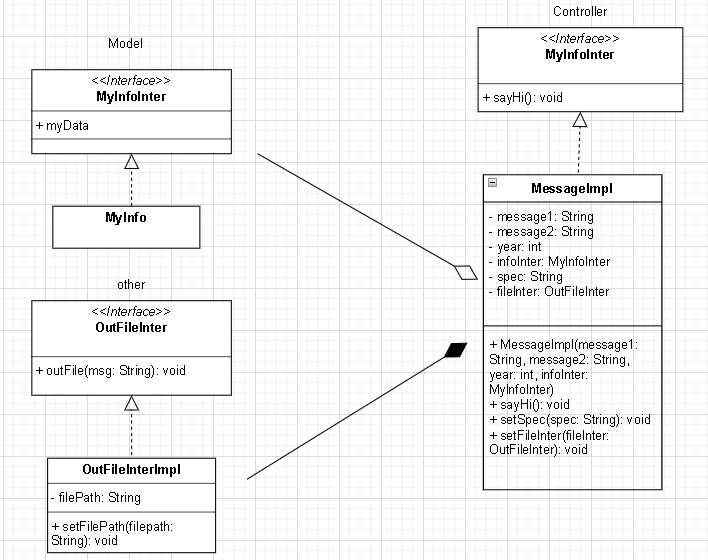
분류작업을 위해 package model, controller, other를 만들어주었다.
Model 부터 시작
인터페이스 & 클라스 생성하기.
MyInfoInter.java
package pack.model;

public interface MyInfoInter {
	String myData();
}
MyInfo.java
package pack.model;

public class MyInfo implements MyInfoInter {

	@Override
	public String myData() {
		return "취미는 축구";
	}
}
MyInfoInter타입의 파생(sub, child)클라스들중 하나로 MyInfo 작성하는것.
여건상 Myinfo 클라스 하나만 만들었지만, MyInfo1 MyInfo2 .. OurInfo 등 여러가지 만들어 인터페이스로 구현할 수 도 있다.
Controller
인터페이스 & 클라스 생성하기.
MessageInter.java
package pack.controller;

public interface MessageInter {
	void sayHi();
}
MessageImpl.java
package pack.controller;

import pack.model.MyInfoInter;
import pack.other.OutFileInter;

public class MessageImpl implements MessageInter{
	//constructor injection
	private String message1, message2; //constructor injection
	private int year;
	private MyInfoInter infoInter; //다형성

	//construction injection 연습
	public MessageImpl(String message1, String message2, int year, MyInfoInter infoInter) { //constructor injection
		this.message1 = message1; //안녕안녕
		this.message2= message2; //잘가잘가
		this.year= year;
		this.infoInter = infoInter;
	}


	//출력
	@Override
	public void sayHi() {
		String msg = "MessageImpl 클래스에서 sayHi 내용: ";
		msg += "\n" + message1 + " "+ message2;
		msg += "\n" + (year+2000)+ "년";
		msg += "\n" + infoInter.myData() ; //다형성.

		msg += "\n" + spec;

		System.out.println(msg); //console출력

	}
}
MessageInter타입의 파생클래스들 중 하나로 MessageImpl 작성해준다.
arrange.xml을 같이 보면서 이야기해보고자한다.
<?xml version="1.0" encoding="UTF-8"?>
<beans xmlns="http://www.springframework.org/schema/beans"
	xmlns:xsi="http://www.w3.org/2001/XMLSchema-instance"
	xsi:schemaLocation="http://www.springframework.org/schema/beans http://www.springframework.org/schema/beans/spring-beans.xsd">

<!-- Constructor Injection -->
	<bean id="mImpl" class="pack.controller.MessageImpl" scope="singleton">
		<constructor-arg index="0" type="java.lang.String">
			<value>안녕안녕</value>
		</constructor-arg>
		<constructor-arg index="1" type="String">
			<value>잘가잘가</value>
		</constructor-arg>
		<constructor-arg index="2" type="int" value="24"/>
		<constructor-arg index="3" type="pack.model.MyInfoInter" ref="gg"/>

	<bean id="myInfo" name="my, gg" class="pack.model.MyInfo"/>
</beans>
Constructor Injection
멤버필드 변수로 선언해준 message1, message2, year, 그리고 인터페이스인 infoInter가 있다.
해당 클래스에서 4개의 파라미터를 가진 생성자를 선언해준다.
그리고 arrange.xml에서 해당 MessageImpl 클래스의 bean을 만들고 값을 넣어준다.
scope
기본값은 Singleton이다. 생략가능.
원할경우 prototype 등으로 적을 수있다. prototype으로 기입시 객체가 매번 생성.
index
파라미터의 순번을 뜻한다. 생략시 순서대로, 적고 다르게 적을경우 지정한 순번대로 값이 입력된다.
만약 1,0 으로 바꿔적었다면 잘가잘가가 안녕안녕보다 먼저 출력된다.
type
말그래도 해당 파라미터 타입. 생략가능.
MyInfoInter타입의 경우 바로 값을 넣어줄 수 없다. ref를 적고
상, 하단 자유롭게 따로 참조할 클라스의 빈 이름을 넣어주면 된다.
MyInfoInter는 수많은 클라스(라고 가정)들 중 MyInfo클라스를 사용할 예정.
이렇게 밖에다 생성해주고 ref로 불러준다는건 다른 곳에서도 해당 클래스를 사용할 예정이라는 의미가 담겨있다.
(UML 다이어그램에서 arrigation 화살표 촉이 빈칸.)
Main.java
package pack.controller;

import org.springframework.context.ApplicationContext;
import org.springframework.context.support.ClassPathXmlApplicationContext;
import org.springframework.context.support.GenericXmlApplicationContext;

public class Main {

	public static void main(String[] args) {

		//ApplicationContext context = new ClassPathXmlApplicationContext("classpath:arrange.xml");
		GenericXmlApplicationContext context = new GenericXmlApplicationContext("classpath:arrange.xml");

		System.out.println("Singleton 확인(클래스로받음)------------------------");
		MessageImpl impl1= (MessageImpl)context.getBean("mImpl");
		impl1.sayHi();
		MessageImpl impl2= (MessageImpl)context.getBean("mImpl");
		impl2.sayHi();

		System.out.println("객체 주소: "+impl1 + " "+ impl2);

		System.out.println("\n다형성 처리(인터페이스로 받음. 캐스팅o)---------------------------");
		MessageInter inter = (MessageInter)context.getBean("mImpl");
		inter.sayHi();

		System.out.println("\n다형성 처리2(인터페이스로 받음.캐스팅X)---------------------------");
		MessageInter inter2 = context.getBean("mImpl", MessageInter.class);
		inter2.sayHi();

		context.close();// 업그레이드된버젼인 generic~에서는 닫아줄수 있다.

	}

}
ApplicationContext 구버젼.
GenericXmlApplicationContext 신버젼.
신버젼의경우 close()가 가능.
Singleton
메인 화면에서 다양하게 출력해보며 확인해본다.
Singleton의 경우 객체를 1개만 생성한다.그래서 imp1과 imp2의 주소가 같음을 확인할 수 있다.
객체 주소: pack.controller.MessageImpl@26b3fd41 pack.controller.MessageImpl@26b3fd41
객체의 주소가 같다. 싱글톤이기에. 객체를 1개만 생성.
만약 arrange.xml에서 prototype으로 변경해주었을경우, heap영역에 2개가 인스턴스되고 주소가 다르게 출력될 것이다.
다형성 Polymorphism
앞서 클래스로 싱글톤을 확인할 경우에는 해당 클래스하나만 사용할 수 있다.
그러나 인터페이스로 객체를 생성하여 사용할경우, 자식 클래스들의 메소드들을 다양하게 활용할 수 있기에 다형성측면에서 이롭다.
해당 부은 캐스팅 유무에 따른 코드 출력모습이다.
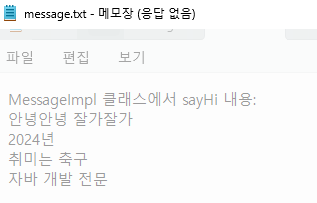
msg를 파일로 출력하고자
추가적으로 폴더 하나를 더 생성해 클라스, 인터페이스를 만들어주었다.
OutFileInter.java
package pack.other;

public interface OutFileInter {
	void outFile(String msg);

}
OutFileInterImpl.java
package pack.other;

import java.io.FileWriter;

public class OutFileInterImpl implements OutFileInter{
	private String filePath; //출력파일 경로 기억

	public void setFilePath(String filePath) {
		this.filePath = filePath;
	}

	@Override
	public void outFile(String msg) {// 메시지를 파일로 출력

	try {
		FileWriter writer  = new FileWriter(filePath);
		writer.write(msg);
		writer.close();
		System.out.println("파일저장완료 확인멘트");
	} catch (Exception e) {
		System.out.println("outFile: "+e);
	}

	}

}
Settter Injection
++MessageImpl.java
package pack.controller;

import pack.model.MyInfoInter;
import pack.other.OutFileInter;

public class MessageImpl implements MessageInter{
	//setter injection
	private String spec;
	private OutFileInter fileInter;

	//setter injection 연습
	public void setSpec(String spec) {
		this.spec = spec;
	}
	public void setFileInter(OutFileInter fileInter) {
		this.fileInter = fileInter;
	}

	//출력연습
	@Override
	public void sayHi() {
		String msg = "MessageImpl 클래스에서 sayHi 내용: ";
		msg += "\n" + message1 + " "+ message2;
		msg += "\n" + (year+2000)+ "년";
		msg += "\n" + infoInter.myData() ; //다형성.

		msg += "\n" + spec;

		System.out.println(msg); //console출력

		//위 msg를 파일로 출력하기
		fileInter.outFile(msg);
	}
}
++arrange.xml
<?xml version="1.0" encoding="UTF-8"?>
<beans xmlns="http://www.springframework.org/schema/beans"
	xmlns:xsi="http://www.w3.org/2001/XMLSchema-instance"
	xsi:schemaLocation="http://www.springframework.org/schema/beans http://www.springframework.org/schema/beans/spring-beans.xsd">

<!-- Setter Injection -->
		<property name="spec">
			<value>자바 개발 전문</value>
		</property>
		<property name="fileInter">
			<ref bean="outFileInterImpl"/>
		</property>
	</bean>

	<bean id="outFileInterImpl" class="pack.other.OutFileInterImpl">
		<property name="filePath" value="c:/work2/message.txt"/>
	</bean>
</beans>
멤버필드로 선언해준 spec, fileInter.
spec 의 경우 setter injection 을 통해 값을 넣어주었고.
fileInter의 경우 밖에다 참고할 클라스outFileInterImpl 객체를 생성해 참고해주었다.
이때 OutFileInterImpl를 보면 해당 bean 안에 property로 다시금 setter injection을 해줌을 알 수 있다.
밖에서 선언해주는 것이아닌 안에서 선언해주면 여기서만 쓸 수있다.
https://ainayoon.tistory.com/9
UML Class Diagram의 화살표들, Class 간의 관계
오늘은 UML의 Class Diagram으로 설계를 진행할 때, 항상 이 화살표를 어떤거를 써야하는지 헷갈려서 정리하는 시간을 가져보겠습니다. UML Class Diagram은 시스템의 구조를 시각화하기 위해 사용되며,
ainayoon.tistory.com
'백엔드 > Spring' 카테고리의 다른 글
| @Scope, @Autowired @Resoruce, @PreConstruct @PreDestroy (0) | 2024.07.07 |
|---|---|
| MyBatis란? Pooling기법 (0) | 2024.07.04 |
| @Component , @Autowired, @Configuration, @ComponentScan (0) | 2024.07.04 |
| Setter Injection (0) | 2024.07.04 |
| MyBatis 환경설정 및 이해 (0) | 2024.07.03 |


